

The Gunsmiths Address Firearms Disassembly
How Do I Learn To Work On Guns Part 2
August 1, 2018
If you have an owner's manual for your firearm, this is an excellent place to start. Read the manual through several times before you pick up a tool. If there is a video available watch it. Does it follow the recommended process in the owner's manual? Does the person in the video appear to be competent? Are they using proper tools that are organized? Do they caution about the spring that they are about to release being under tension, or other safety concerns? The gunsmiths address firearms disassembly.
Assemble the proper tools; lay them out in a clean and safe work area that is free from distractions like TV. Pull up the video, have your instructions handy, and then go and get the firearm. In a safe location, check several times to insure that the firearm is completely empty. I cannot tell you how often the words ..."but I thought it was empty..." have been spoken. Even an "empty" gun should never be pointed at anything you are not willing to destroy.

Work Slowly
When disassembling a firearm, work slowly. Have a clean uncluttered area to lay out parts. Small zip top plastic bags are an excellent way to keep sub-assemblies together and organized. Blue painters tape can be used to tag and keep track of small pins, springs and those pesky little detent balls. When working on more than one gun, such as when waiting for parts, boxes for each gun help to keep the parts separated.
We frequently use empty boxes from larger target-type scopes, as they will usually accommodate all of the smaller parts. Cell phone cameras can be used to photograph the way that parts look in a gun, so you can get them in there correctly during reassembly.

Cleaning Supplies
Cleaning supplies to have handy are spray-type cleaning chemicals (aerosol or pump), cotton swabs, tooth picks, pipe cleaners, new tooth brushes and isopropyl alcohol. While the gun is apart, this is an excellent time to detail clean, inspect and lubricate. All too often, people have a tendency to over lubricate their guns. The lubricant mixes with dust, dirt and powder residue forming a gummy film. This can cause problems all the way up to failures to fire or cycle.
It should be noted that WD-40, while an excellent product, is a (W)ater (D)isplacing liquid, and not a lubricant. It can have a negative effect on primers and gun powder, and should not be used as a firearm lubricant. It is, however, an excellent cleaner, particularly if a gun has been in the rain or otherwise exposed to water. A good cleaning with WD-40, and then a thorough drying and light lubrication with gun oil is a good way to stave off rust.

Be Careful With Oils
Do not let gun oils soak into the wood of the stock. Particularly not in the areas of inletting for metal parts. It will cause the fibers of the wood to break down and become spongy, eventually rotting. This is a good time to make sure that the hidden areas of the stock are adequately sealed from the possible introduction of any moisture. Changes in moisture in the wood can cause it to warp and have a very detrimental effect on accuracy (one of the reasons why we glass bed).

You can seal the wood by rubbing in a light coating of wood finishing oil. Organic or mainly organic finish products soak into the wood fibers rather than sitting on top. Thus they do not change internal dimensions. Allow the finish to dry completely as per the directions prior to reassembly.
Trigger Pull
An often-targeted area for improvement is that of trigger pull. A good or bad trigger has absolutely no impact on the inherent accuracy of the gun, but it has everything to do with an individual's ability to shoot the gun to their individual level of proficiency. By this I mean that not everyone practices enough. Not everyone is coached on how to shoot well, and not everyone has the same level of ability. I would love to be able to throw a 90-mile-per-hour fastball with pinpoint control... however, back to triggers.

This area of gunsmithing has changed through the years. Triggers were once of the old type factory, or military type, and any modification required an experienced gunsmith. Then came the age of factory-adjustable triggers. These permitted a degree of tinkering by lay persons to allow for lightening the pull (sometimes to unsafe levels for several reasons). As a result of either past litigation, or sometimes fear of future litigation, the factory triggers were made almost tamper proof, as well as having terrible trigger pulls.
By terrible, I do not only speak of the weight of the pull, but also of excessive take up, long over-travel and gritty engagement. Consumers demanded better triggers, and some mechanical design advancements have resulted in some excellent user adjustable factory triggers that are safe in use, with minimal take up, crisp releases, and almost no over travel.

These Terms
What do these terms refer to? Most people know a good trigger when they feel it, but do not realize that there are different parts of a trigger pull, particularly if they were never taught not to jerk a trigger, but to press (or also called pull, but never jerk) the trigger rearward with steadily and gently increasing pressure.
The first movement of the trigger is the take-up. This is when the trigger is moving rearward, but there is no movement of the sear toward reaching its point of disengagement. This can be as long as a quarter inch or more, or an almost imperceptible fraction of an inch.

Sear Engagement
The next function occurs at the sear engagement. This is the mechanism that stops the gun from firing when it is cocked, by keeping the hammer back, the striker retained against spring pressure etc. The sear engagement points are two surfaces that are parallel to each other. Pulling back on the trigger lever moves the sear out of engagement, allowing the gun to fire.
Trigger jobs on existing triggers will involve polishing of the two surfaces to reduce friction and adjusting the amount of contact to minimize movement before release. Replacement of springs will likely be involved to reduce the pressure needed to release the sear.
After the release of the sear, the trigger lever must allow continuation of the sear movement to keep the top from dragging. Drag is further minimized by the angle at the back of the sear engagement. This is over travel. Too much over travel allows for movement in excess of what is required for proper follow through, increasing movement and hurting consistency and accuracy of the shooter.

How To Improve The Trigger
While understanding these functions and how they are accomplished are important, modifying them is also not part of the realm of the new home gunsmith, and will likely be very dangerous. Changing an angle, reducing engagement, or polishing through surface hardening can easily result in an unsafe firearm. So what do we do to improve our gun's trigger?
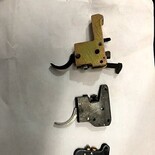
Fortunately, there is a safe answer. Install an aftermarket trigger. Most aftermarket triggers are fully contained in a housing with all of the above steps such as cutting and polishing already done. These units have external screw type adjustments for take up, sear engagement and over travel.
Timney Triggers
While there are a number of brands, all of which are good, a personal favorite are the triggers made by Timney Triggers. This is an Arizona Company that not only has triggers for many different rifles, but also several triggers for some types of rifles with each having different features. If you need a specific trigger, they not only will have it, but back it with exceptional customer service and easy-to-follow directions.
Set the trigger for use in the real world. If this is primarily a hunting gun, remember you will be carrying it in rough terrain in cold weather. Having a crisp, safe trigger is far more important than having a super light trigger that you will not be able to safely control.
Safety Checks
There are some safety checks that you must make anytime that you work on internal mechanisms of your gun. First, you must absolutely ensure that the gun is empty. Next, recheck to verify that the gun is totally empty. Cock the firing mechanism, and bounce the butt of the stock flat on a rubber matt, to see if the rifle remains cocked. Pull the trigger to ensure that the sear releases cleanly.
Recock the mechanism and cycle the action briskly to ensure that it remains cocked. Engage the safety and pull the trigger hard to insure the safety functions. With your finger off the trigger, take off the safety. The gun should remain cocked and the sear should not release. At this time, the rifle should be inspected to ensure the chamber and barrel are clear, and then take the gun to the range, and following all safety rules test fired to verify proper function.
If this article has peaked your interest, there is a book titled Gunsmith Kinks by F.R. "Bob" Brownell, which covers a dozen subjects you will find interesting. I know that I sure did!
For now, good luck and safe shooting.
For more great tips from the experts visit http://www.westernoutdoortimes.com/search/mike_berger_and_pat_knight .

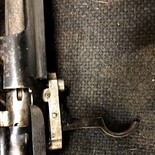
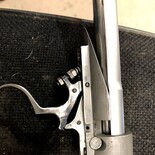
Winchester Factory Trigger

Reader Comments(0)